All Stories
Add Beautiful heart widget to your blog or website .It will be present at bottom of your web.When you move your courser it opens and the social icons are open.All social media sharing icon are present in that heart.IT is very beautiful and attractive.

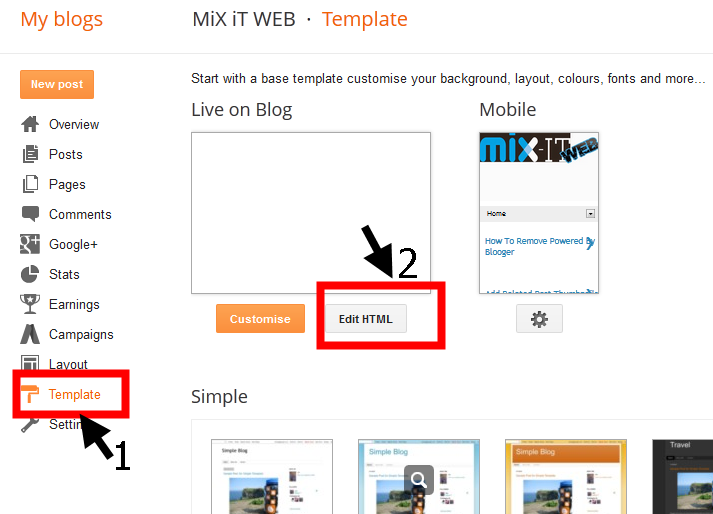
Step 1:

     Go to the template and edit HTML
  

Step 2:

       And press Ctrl+F and serach for </head>
 

Step 3:

Copy and paste the below code above the </head>


  !-- Start Heart Bookmarking Widget From https://mixitweb.blogspot.com -->
<script src='http://w.sharethis.com/gallery/shareegg/shareegg.js' type='text/javascript'/>
<script src='http://w.sharethis.com/button/buttons.js' type='text/javascript'/>
<script type='text/javascript'>stLight.options({publisher: &quot;ur-98d377f-bdd3-9ad1-fbe5-2a678f0a60ee&quot;, onhover:false}); </script>
<link href='http://w.sharethis.com/gallery/shareegg/shareegg.css' media='screen' rel='stylesheet' type='text/css'/>
<!-- End Heart Bookmarking Widget From https://mixitweb.blogspot.com -->

Step 4:

Now search for the below code </body>

Step 5:   

   
Copy and paste this code before </body>

!-- Start Heart Share Code From https://mixitweb.blogspot.com -->
<div style='position: fixed; bottom: 2%; left: 2%;'>
<div class='shareEgg' id='shareThisShareHeart'/>
</div>
<script type='text/javascript'>stlib.shareEgg.createEgg(&#39;shareThisShareHeart&#39;, [&#39;facebook&#39;,&#39;twitter&#39;,&#39;pinterest&#39;,&#39;linkedin&#39;,&#39;stumbleupon&#39;,&#39;email&#39;,&#39;sharethis&#39;], {title:&#39; <data:blog.pageTitle/>&#39;,url:&#39;<data:blog.url/>&#39;,theme:&#39;shareheart&#39;});</script><a href="http://www.coloredblog.com/2014/02/how-to-add-heart-bookmarking-widget-on.html" target="_blank">Widget</a>
<!-- End Heart Share Code From https://mixitweb.blogspot.com -->

Add Beautiful heart widget to your blog or website

Add Beautiful heart widget to your blog or website .It will be present at bottom of your web.When you move your courser it opens and the social icons are open.All social media sharing icon are present in that heart.IT is very beautiful and attractive.

Step 1:

     Go to the template and edit HTML
  

Step 2:

       And press Ctrl+F and serach for </head>
 

Step 3:

Copy and paste the below code above the </head>


  !-- Start Heart Bookmarking Widget From https://mixitweb.blogspot.com -->
<script src='http://w.sharethis.com/gallery/shareegg/shareegg.js' type='text/javascript'/>
<script src='http://w.sharethis.com/button/buttons.js' type='text/javascript'/>
<script type='text/javascript'>stLight.options({publisher: &quot;ur-98d377f-bdd3-9ad1-fbe5-2a678f0a60ee&quot;, onhover:false}); </script>
<link href='http://w.sharethis.com/gallery/shareegg/shareegg.css' media='screen' rel='stylesheet' type='text/css'/>
<!-- End Heart Bookmarking Widget From https://mixitweb.blogspot.com -->

Step 4:

Now search for the below code </body>

Step 5:   

   
Copy and paste this code before </body>

!-- Start Heart Share Code From https://mixitweb.blogspot.com -->
<div style='position: fixed; bottom: 2%; left: 2%;'>
<div class='shareEgg' id='shareThisShareHeart'/>
</div>
<script type='text/javascript'>stlib.shareEgg.createEgg(&#39;shareThisShareHeart&#39;, [&#39;facebook&#39;,&#39;twitter&#39;,&#39;pinterest&#39;,&#39;linkedin&#39;,&#39;stumbleupon&#39;,&#39;email&#39;,&#39;sharethis&#39;], {title:&#39; <data:blog.pageTitle/>&#39;,url:&#39;<data:blog.url/>&#39;,theme:&#39;shareheart&#39;});</script><a href="http://www.coloredblog.com/2014/02/how-to-add-heart-bookmarking-widget-on.html" target="_blank">Widget</a>
<!-- End Heart Share Code From https://mixitweb.blogspot.com -->

Posted at 04:50 |  by Unknown
It is very important that you website or blog has the subscription button with this the visitors will subscribe when they will come to your website or blog and will subscribe with  your blog and will receive your articles as you update it .So they will not miss a single article and you will increase your traffic and boost your money.

           FLOW THE STEP BELOW TO ADD THIS WIDGET TO YOUR BLOG

Step 1:

  Go to the template and edit HTML

Step 2:

     Now find this code <div class='post-footer'>  with the help of Ctrl +F

Step 3:

       Now past the folllowing HTML code above this <div class='post-footer'>

<div id="helperblogger-emailbox">
    <form id="helperblogger-emailform" action="http://feedburner.google.com/fb/a/mailverify"
    method="post" target="popupwindow" onsubmit="window.open('http://feedburner.google.com/fb/a/mailverify?uri= lordhtml', 'popupwindow', 'scrollbars=yes,width=550,height=520');return true">
        <input type="hidden" value="lordhtml " name="uri" />
        <input type="text" id="s" name="email" value="Enter Your E-Mail Here"
        onfocus='if (this.value == "Enter Your E-Mail Here") {this.value = ""}'
        onblur='if (this.value == "") {this.value = "Enter Your E-Mail Here";}'
        />
        <input type="hidden" name="loc" value="en_US" />
        <input type="image" src="http://img1.blogblog.com/img/blank.gif" id="sbutton"
        />
    </form>
</div>

Step 4:

Now find this code   ]]></b:skin>

Step 5:

   And paste this code above  ]]></b:skin>
   
#helperblogger-emailbox {
    background: url(https://blogger.googleusercontent.com/img/b/R29vZ2xl/AVvXsEhyb5b9uPocKTtWcgTmxKEzcNUN-GJBQbhgRtlMW16YQqKiftjkXnN-CnQU4oiW8n_i8NszuZaxT_E35gZP7bPdF8yBVLJwPN7Yw16hDaU02wRjuZBvH4-COmOJQF65lWJJYVUKgE14hrA/s1600/helperblogger.com-red.png)no-repeat scroll center center transparent;
    height: 143px;
    width: 368px;
}
form#helperblogger-emailform {
    display: block;
    margin: 0;
    padding-left: 42px;
    padding-top: 67px;
}
form#helperblogger-emailform #s {
    background: transparent;
    border: none;
    color: #444242;
    font-family: georgia;
    font-size: 15px;
    font-style: italic;
    height: 30px;
    margin-top: -2px;
    padding-left: 2px;
    vertical-align: top;
    width: 227px;
}
form#helperblogger-emailform #sbutton {
    background: transparent;
    border: none;
    cursor: pointer;
    height: 30px;
    padding-right: 45px;
}

Step 6:

    Save the template and now you are done.


Add Best Email Subscrition Box For Bloggers

It is very important that you website or blog has the subscription button with this the visitors will subscribe when they will come to your website or blog and will subscribe with  your blog and will receive your articles as you update it .So they will not miss a single article and you will increase your traffic and boost your money.

           FLOW THE STEP BELOW TO ADD THIS WIDGET TO YOUR BLOG

Step 1:

  Go to the template and edit HTML

Step 2:

     Now find this code <div class='post-footer'>  with the help of Ctrl +F

Step 3:

       Now past the folllowing HTML code above this <div class='post-footer'>

<div id="helperblogger-emailbox">
    <form id="helperblogger-emailform" action="http://feedburner.google.com/fb/a/mailverify"
    method="post" target="popupwindow" onsubmit="window.open('http://feedburner.google.com/fb/a/mailverify?uri= lordhtml', 'popupwindow', 'scrollbars=yes,width=550,height=520');return true">
        <input type="hidden" value="lordhtml " name="uri" />
        <input type="text" id="s" name="email" value="Enter Your E-Mail Here"
        onfocus='if (this.value == "Enter Your E-Mail Here") {this.value = ""}'
        onblur='if (this.value == "") {this.value = "Enter Your E-Mail Here";}'
        />
        <input type="hidden" name="loc" value="en_US" />
        <input type="image" src="http://img1.blogblog.com/img/blank.gif" id="sbutton"
        />
    </form>
</div>

Step 4:

Now find this code   ]]></b:skin>

Step 5:

   And paste this code above  ]]></b:skin>
   
#helperblogger-emailbox {
    background: url(https://blogger.googleusercontent.com/img/b/R29vZ2xl/AVvXsEhyb5b9uPocKTtWcgTmxKEzcNUN-GJBQbhgRtlMW16YQqKiftjkXnN-CnQU4oiW8n_i8NszuZaxT_E35gZP7bPdF8yBVLJwPN7Yw16hDaU02wRjuZBvH4-COmOJQF65lWJJYVUKgE14hrA/s1600/helperblogger.com-red.png)no-repeat scroll center center transparent;
    height: 143px;
    width: 368px;
}
form#helperblogger-emailform {
    display: block;
    margin: 0;
    padding-left: 42px;
    padding-top: 67px;
}
form#helperblogger-emailform #s {
    background: transparent;
    border: none;
    color: #444242;
    font-family: georgia;
    font-size: 15px;
    font-style: italic;
    height: 30px;
    margin-top: -2px;
    padding-left: 2px;
    vertical-align: top;
    width: 227px;
}
form#helperblogger-emailform #sbutton {
    background: transparent;
    border: none;
    cursor: pointer;
    height: 30px;
    padding-right: 45px;
}

Step 6:

    Save the template and now you are done.


Posted at 04:11 |  by Unknown

Here is a good way of displaying Related post thumbnails in your website for free with the help of HTML.We have also give other 
way of displaying Related post widgets but they are through website and they display their name so that does not look good.Today i will show you a way which is editing HTML and with that no name will be displayed.

 Step 1:

     Go to the blogger.com and open template and edit HTML

Step 2:

        Than press Ctrl+F and find </head> and than past this

<!--Related Posts with thumbnails Scripts and Styles Start-->
<b:if cond='data:blog.pageType == &quot;item&quot;'>
<style type='text/css'>
#related-posts{float:left;width:auto;}
#related-posts a{border-right: 1px dotted #eaeaea;}
#related-posts a:hover{background: #EEEEEE;}
#related-posts h2{margin-top: 10px;background:none;font:18px Oswald;padding:3px;color:#999999; text-transform:uppercase;}
#related-posts .related_img {margin:5px;border:2px solid #f2f2f2;width:110px;height:100px;transition:all 300ms ease-in-out;-webkit-transition:all 300ms ease-in-out;-moz-transition:all 300ms ease-in-out;-o-transition:all 300ms ease-in-out;-ms-transition:all 300ms ease-in-out;-webkit-border-radius: 5px;  -moz-border-radius: 5px; border-radius: 5px; }
#related-title {color:#666;text-align:center;padding: 0px 5px 10px;font-size:12px;width:110px; height: 40px;}
#related-posts .related_img:hover{border:2px solid #E8E8E8;opacity:.7;filter:alpha(opacity=70);-moz-opacity:.7;-khtml-opacity:.7}</style>
<script type='text/javascript' src='http://helplogger.googlecode.com/svn/trunk/relatedposts.js' />
</b:if>
<!--Related Posts with thumbnails Scripts and Styles End--> 


Step 3:

  Than find  this code <div class='post-footer'> and past this below it  


<!-- Related Posts with Thumbnails Code Start-->
<b:if cond='data:blog.pageType == &quot;item&quot;'>
<div id='related-posts'>
<b:loop values='data:post.labels' var='label'>
<b:if cond='data:label.isLast != &quot;true&quot;'>
</b:if>
<script expr:src='&quot;/feeds/posts/default/-/&quot; + data:label.name + &quot;?alt=json-in-script&amp;callback=related_results_labels_thumbs&amp;max-results=5&quot;' type='text/javascript'/></b:loop>
<script type='text/javascript'>
var currentposturl=&quot;<data:post.url/>&quot;;
var maxresults=5;
var relatedpoststitle=&quot;<b>Related Posts:</b>&quot;;
removeRelatedDuplicates_thumbs();
printRelatedLabels_thumbs();
</script>
</div><div class='clear'/><div style="font-size: 9px; color: #BABABA; float: right; margin: 5px;">Get this <a  style="font-size: 9px; text-decoration: none;" href="
http://helplogger.googlecode.com/svn/trunk/relatedposts.js'" rel="nofollow" >Related Posts Widget</a></div>
</b:if>
<!-- Related Posts with Thumbnails Code End--> 

Note:

There are two code of  <div class='post-footer'>   You have to place after the second one.

Add Related Post Thumbnails In HTML


Here is a good way of displaying Related post thumbnails in your website for free with the help of HTML.We have also give other 
way of displaying Related post widgets but they are through website and they display their name so that does not look good.Today i will show you a way which is editing HTML and with that no name will be displayed.

 Step 1:

     Go to the blogger.com and open template and edit HTML

Step 2:

        Than press Ctrl+F and find </head> and than past this

<!--Related Posts with thumbnails Scripts and Styles Start-->
<b:if cond='data:blog.pageType == &quot;item&quot;'>
<style type='text/css'>
#related-posts{float:left;width:auto;}
#related-posts a{border-right: 1px dotted #eaeaea;}
#related-posts a:hover{background: #EEEEEE;}
#related-posts h2{margin-top: 10px;background:none;font:18px Oswald;padding:3px;color:#999999; text-transform:uppercase;}
#related-posts .related_img {margin:5px;border:2px solid #f2f2f2;width:110px;height:100px;transition:all 300ms ease-in-out;-webkit-transition:all 300ms ease-in-out;-moz-transition:all 300ms ease-in-out;-o-transition:all 300ms ease-in-out;-ms-transition:all 300ms ease-in-out;-webkit-border-radius: 5px;  -moz-border-radius: 5px; border-radius: 5px; }
#related-title {color:#666;text-align:center;padding: 0px 5px 10px;font-size:12px;width:110px; height: 40px;}
#related-posts .related_img:hover{border:2px solid #E8E8E8;opacity:.7;filter:alpha(opacity=70);-moz-opacity:.7;-khtml-opacity:.7}</style>
<script type='text/javascript' src='http://helplogger.googlecode.com/svn/trunk/relatedposts.js' />
</b:if>
<!--Related Posts with thumbnails Scripts and Styles End--> 


Step 3:

  Than find  this code <div class='post-footer'> and past this below it  


<!-- Related Posts with Thumbnails Code Start-->
<b:if cond='data:blog.pageType == &quot;item&quot;'>
<div id='related-posts'>
<b:loop values='data:post.labels' var='label'>
<b:if cond='data:label.isLast != &quot;true&quot;'>
</b:if>
<script expr:src='&quot;/feeds/posts/default/-/&quot; + data:label.name + &quot;?alt=json-in-script&amp;callback=related_results_labels_thumbs&amp;max-results=5&quot;' type='text/javascript'/></b:loop>
<script type='text/javascript'>
var currentposturl=&quot;<data:post.url/>&quot;;
var maxresults=5;
var relatedpoststitle=&quot;<b>Related Posts:</b>&quot;;
removeRelatedDuplicates_thumbs();
printRelatedLabels_thumbs();
</script>
</div><div class='clear'/><div style="font-size: 9px; color: #BABABA; float: right; margin: 5px;">Get this <a  style="font-size: 9px; text-decoration: none;" href="
http://helplogger.googlecode.com/svn/trunk/relatedposts.js'" rel="nofollow" >Related Posts Widget</a></div>
</b:if>
<!-- Related Posts with Thumbnails Code End--> 

Note:

There are two code of  <div class='post-footer'>   You have to place after the second one.

Posted at 03:59 |  by Unknown
Add beautiful related content to your website which will increase your  traffic.The related content plays an important role in increase the traffic.When first of all you start your website you should add  related content   to your website.This will boost your traffic.
Here i will show you how to add beautiful  related content to your website step by step with pics.

Step 1:

  Go to https://www.shareaholic.com 

Step 2:

  Sign Up For free there

Step 3:

  Add your web site name and URL


Step 4: 

Add the name where you want to display it eg. Below post and headline text will be YOU MIGHT LIKE IT and chose the theme which you want.
MixiTWEB.com

  Setp 5:

Than copy the step code and past it in the HTML/JAVASCRIPT  in your website and than press OK.


Add |You may also like | Related Content| To Your Web Site For Free

Add beautiful related content to your website which will increase your  traffic.The related content plays an important role in increase the traffic.When first of all you start your website you should add  related content   to your website.This will boost your traffic.
Here i will show you how to add beautiful  related content to your website step by step with pics.

Step 1:

  Go to https://www.shareaholic.com 

Step 2:

  Sign Up For free there

Step 3:

  Add your web site name and URL


Step 4: 

Add the name where you want to display it eg. Below post and headline text will be YOU MIGHT LIKE IT and chose the theme which you want.
MixiTWEB.com

  Setp 5:

Than copy the step code and past it in the HTML/JAVASCRIPT  in your website and than press OK.


Posted at 01:56 |  by Unknown
Add beautiful sexy icons to your website which will increase your sharing and traffic.The social media plays an important role in increase the traffic.When first of all you start your website you should add social media sharing and following icons to your website.This will boost your traffic.
Here i will show you how to add beautiful sexy icon to your website step by step with pics.

Step 1:

  Go to https://www.shareaholic.com 

Step 2:

  Sign Up For free there

Step 3:

  Add your web site name and URL

Step 4:

  Than type the place where you want to post and how you like the sharing icon to be presented on your website.there are many option.


Step 5:

  Than copy the setup Code and add in HTML/JavaScript and place it below the post and than press ok


Add Sexy Social Media Icon To Your Website

Add beautiful sexy icons to your website which will increase your sharing and traffic.The social media plays an important role in increase the traffic.When first of all you start your website you should add social media sharing and following icons to your website.This will boost your traffic.
Here i will show you how to add beautiful sexy icon to your website step by step with pics.

Step 1:

  Go to https://www.shareaholic.com 

Step 2:

  Sign Up For free there

Step 3:

  Add your web site name and URL

Step 4:

  Than type the place where you want to post and how you like the sharing icon to be presented on your website.there are many option.


Step 5:

  Than copy the setup Code and add in HTML/JavaScript and place it below the post and than press ok


Posted at 01:33 |  by Unknown

Alexa Rank

back to top