All Stories
When we link the menu tabs with the labels than when we click the menu tab than this message comes that showing post with label .....Show all posts. Many bloggers want to remove it .If you also want to remove it follow the following steps and make it remove from blog and enjoy blogging.

                  Remove Showing Post With Label....Show All Posts  Tutorial


Step 1:

        Go to  edit HTML  


Step 2:

        Search for this code with the help of ctrl +F 
 <b:includable id='status-message'>

Step 3:

      After you find this code press the arrow and expand it 


Step 4:

  
     Now remove the code from the first to last all.


<b:includable id='status-message'>
<b:if cond='data:navMessage'>
<div class='status-msg-wrap'>
<div class='status-msg-body'>
<data:navMessage/>
</div>
<div class='status-msg-border'>
<div class='status-msg-bg'>
<div class='status-msg-hidden'><data:navMessage/></div>
</div>
</div>
</div>
<div style='clear: both;'/>
</b:if>
</b:includable>


Step 5:

   
    Now replace it with the following code

<b:includable id='status-message'>
<b:if cond='data:navMessage'>
<div>
</div>
<div style='clear: both;'/>
</b:if>
</b:includable>


Step 6:

      Now save it and you are done.Hope it will help you.


Remove Showing Post With Label in Blogger

When we link the menu tabs with the labels than when we click the menu tab than this message comes that showing post with label .....Show all posts. Many bloggers want to remove it .If you also want to remove it follow the following steps and make it remove from blog and enjoy blogging.

                  Remove Showing Post With Label....Show All Posts  Tutorial


Step 1:

        Go to  edit HTML  


Step 2:

        Search for this code with the help of ctrl +F 
 <b:includable id='status-message'>

Step 3:

      After you find this code press the arrow and expand it 


Step 4:

  
     Now remove the code from the first to last all.


<b:includable id='status-message'>
<b:if cond='data:navMessage'>
<div class='status-msg-wrap'>
<div class='status-msg-body'>
<data:navMessage/>
</div>
<div class='status-msg-border'>
<div class='status-msg-bg'>
<div class='status-msg-hidden'><data:navMessage/></div>
</div>
</div>
</div>
<div style='clear: both;'/>
</b:if>
</b:includable>


Step 5:

   
    Now replace it with the following code

<b:includable id='status-message'>
<b:if cond='data:navMessage'>
<div>
</div>
<div style='clear: both;'/>
</b:if>
</b:includable>


Step 6:

      Now save it and you are done.Hope it will help you.


Posted at 04:40 |  by Unknown
If you want to display your post in a gird  view with thumbnails to make your blog more charming here is the right place.Now you have to follow my steps and than you are done .If you have any problem you can ask me by writing a comment.

Step 1:

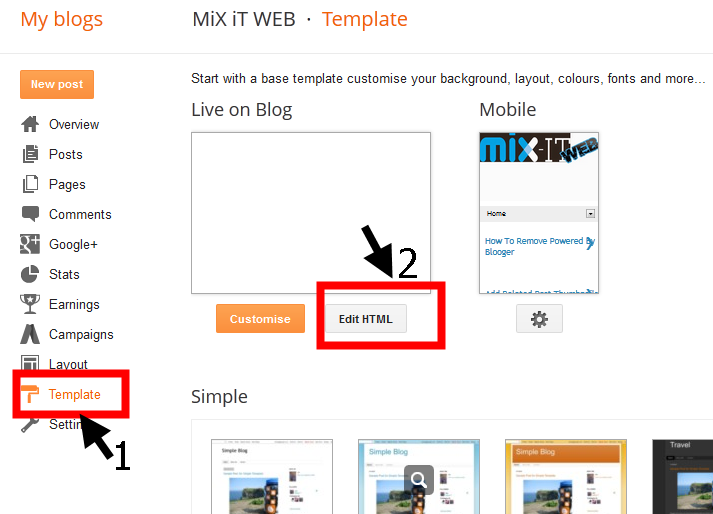
        Go to template and edit HTML

Step 2:

  Than press ctrl+F and find this tag </head>.

 Step 3 :

        Than just about this tag past the following code.
            
  script src="http://code.jquery.com/jquery-1.9.1.js"></script>
<script src="http://code.jquery.com/jquery-migrate-1.1.0.js"></script>

<b:if cond='data:blog.pageType == &quot;index&quot;'>
<script type='text/javascript'>//<![CDATA[
$(document).ready(function() {

    var width = 200;
    var height = 170;
    var placeholder = 'https://blogger.googleusercontent.com/img/b/R29vZ2xl/AVvXsEg6IVTcYUogTzKHiqUT-ao1nFEH5sWWNasX1_7bye-QbzO9oZQrS5V9FIvqEzkCLIExnL2Tphy72jJ2XybpiQ5v9UwVwba9IMVvVqnUpzqtzB9xX0hjDQC4uE3nueeK-vQ8tam3B8ko80Y/s1600/no-thumb.png';
    var margins = "0px 0px 10px 10px";
    var fitThumb = 1;
    var titleTopPadding = 5;
    var titleBottomPadding = 8;
    var titleLeftRightPadding = 5;

    var titlePadding = titleTopPadding + 'px ' + titleLeftRightPadding + 'px ' + titleBottomPadding + 'px ' + titleLeftRightPadding + 'px';
    $('.post-body').each(function(n, wrapper) {
        var wrapper = $(wrapper);
        var image = $(wrapper).find('img').first();
        var link = wrapper.parent().find('h3 a');
        var linkURL = link.attr('href');
        var linkTitle = link.text();

        $(link).remove();
        wrapper.empty();

        if (image.attr('src')) {
            var thumbHeight = image.attr('height');
            var thumbWidth = image.attr('width');
            var thumbParent = $(image).parent();

            wrapper.append(thumbParent);

            if (fitThumb) {
                image.attr({
                    src: image.attr('src').replace(/s\B\d{3,4}/, 's' + width + '-c')
                    });
                image.attr('width', width).attr('height', height);
            } else {
                image.attr({
                    src: image.attr('src').replace(/s\B\d{3,4}/, 's' + width)
                    });
                image.attr('width', width);
                var changeHeight = (thumbHeight / thumbWidth * width).toFixed(0);
                image.attr('height', changeHeight);
            }

        } else {
            var image = $('<img>').attr('src', placeholder).attr('height', height).attr('width', width);
            var thumbParent = $('<a>').append(image).appendTo(wrapper);
        }

        thumbParent.attr('href', linkURL).css('clear', 'none').css('margin-left', '0').css('margin-right', '0').addClass('postThumbnail');

        var thumbTitle = $('<div>').prepend(linkTitle).css('padding', titlePadding).css('opacity', '0.9').css('filter', 'alpha(opacity=0.9)').css('width', width).appendTo(thumbParent);
        var ptitleHeight = thumbTitle.height();
        var summary = parseInt(ptitleHeight) + parseInt(titleTopPadding) + parseInt(titleBottomPadding);
        thumbTitle.css('margin-top', '-' + summary + 'px');
        wrapper.css('float', 'left').css('height', height).css('width', width).css('margin', margins).css('overflow', 'hidden');
    });
    $('#blog-pager').css('clear', 'both');
});

function hideLightbox() {
    var images = document.getElementsByTagName('img');
    for (var i = 0; i < images.length;++i) {
        images[i].onmouseover = function() {
            var html = this.parentNode.innerHTML;
            this.parentNode.innerHTML = html;
            this.onmouseover = null;
        };
    }
}

if (window.addEventListener) {
    window.addEventListener('load', hideLightbox, undefined);
} else {
    window.attachEvent('onload', hideLightbox);
}
//]]>
</script>
<style>
.post {
    border-bottom: 0 dotted #E6E6E6;
    margin-bottom: 0;
    padding-bottom: 0;
}

h2,.post-footer {
    display: none;
}

a.postThumbnail div {
    text-decoration: none;
    color: #fff;
    font-size: 12px;
    font-weight: bold;
    text-transform: capitalize;
    background: rgb(125,126,125);
 /* Old browsers */
    background: -moz-linear-gradient(top,  rgba(125,126,125,1) 0%, rgba(14,14,14,1) 100%);
    background: -webkit-gradient(linear, left top, left bottom, color-stop(0%,rgba(125,126,125,1)), color-stop(100%,rgba(14,14,14,1)));
 /* Chrome,Safari4+ */
    background: -webkit-linear-gradient(top,  rgba(125,126,125,1) 0%,rgba(14,14,14,1) 100%);
    background: -o-linear-gradient(top,  rgba(125,126,125,1) 0%,rgba(14,14,14,1) 100%);
    background: -ms-linear-gradient(top,  rgba(125,126,125,1) 0%,rgba(14,14,14,1) 100%);
    background: linear-gradient(to bottom,  rgba(125,126,125,1) 0%,rgba(14,14,14,1) 100%);
    filter: progid:DXImageTransform.Microsoft.gradient( startColorstr=&#39;
    #7d7e7d&#39;, endColorstr=&#39;#0e0e0e&#39;,GradientType=0 );
}

a.postThumbnail:hover div {
    display: block;
}

.post-body img {
    background-color: transparent;
    border: 1px solid transparent;
    padding: 0px;
    -webkit-border-radius: 12px;
    -moz-border-radius: 12px;
    border-radius: 12px;
    opacity: 1;
    transition: opacity .25s ease-in-out;
    -moz-transition: opacity .25s ease-in-out;
    -webkit-transition: opacity .25s ease-in-out;
}

.post-body img:hover {
    -ms-filter: &quot;
    progid: DXImageTransform.Microsoft.Alpha(Opacity=70)&quot;
    ;

filter: alpha(opacity=70);
    -moz-opacity: 0.7;
    -khtml-opacity: 0.7;
    opacity: 0.7;
}
</style>
</b:if>

 Step 4:

      Now press save template and view your blog you will now having grid view.
Enjoy!

How To Display Posts In Girds View

If you want to display your post in a gird  view with thumbnails to make your blog more charming here is the right place.Now you have to follow my steps and than you are done .If you have any problem you can ask me by writing a comment.

Step 1:

        Go to template and edit HTML

Step 2:

  Than press ctrl+F and find this tag </head>.

 Step 3 :

        Than just about this tag past the following code.
            
  script src="http://code.jquery.com/jquery-1.9.1.js"></script>
<script src="http://code.jquery.com/jquery-migrate-1.1.0.js"></script>

<b:if cond='data:blog.pageType == &quot;index&quot;'>
<script type='text/javascript'>//<![CDATA[
$(document).ready(function() {

    var width = 200;
    var height = 170;
    var placeholder = 'https://blogger.googleusercontent.com/img/b/R29vZ2xl/AVvXsEg6IVTcYUogTzKHiqUT-ao1nFEH5sWWNasX1_7bye-QbzO9oZQrS5V9FIvqEzkCLIExnL2Tphy72jJ2XybpiQ5v9UwVwba9IMVvVqnUpzqtzB9xX0hjDQC4uE3nueeK-vQ8tam3B8ko80Y/s1600/no-thumb.png';
    var margins = "0px 0px 10px 10px";
    var fitThumb = 1;
    var titleTopPadding = 5;
    var titleBottomPadding = 8;
    var titleLeftRightPadding = 5;

    var titlePadding = titleTopPadding + 'px ' + titleLeftRightPadding + 'px ' + titleBottomPadding + 'px ' + titleLeftRightPadding + 'px';
    $('.post-body').each(function(n, wrapper) {
        var wrapper = $(wrapper);
        var image = $(wrapper).find('img').first();
        var link = wrapper.parent().find('h3 a');
        var linkURL = link.attr('href');
        var linkTitle = link.text();

        $(link).remove();
        wrapper.empty();

        if (image.attr('src')) {
            var thumbHeight = image.attr('height');
            var thumbWidth = image.attr('width');
            var thumbParent = $(image).parent();

            wrapper.append(thumbParent);

            if (fitThumb) {
                image.attr({
                    src: image.attr('src').replace(/s\B\d{3,4}/, 's' + width + '-c')
                    });
                image.attr('width', width).attr('height', height);
            } else {
                image.attr({
                    src: image.attr('src').replace(/s\B\d{3,4}/, 's' + width)
                    });
                image.attr('width', width);
                var changeHeight = (thumbHeight / thumbWidth * width).toFixed(0);
                image.attr('height', changeHeight);
            }

        } else {
            var image = $('<img>').attr('src', placeholder).attr('height', height).attr('width', width);
            var thumbParent = $('<a>').append(image).appendTo(wrapper);
        }

        thumbParent.attr('href', linkURL).css('clear', 'none').css('margin-left', '0').css('margin-right', '0').addClass('postThumbnail');

        var thumbTitle = $('<div>').prepend(linkTitle).css('padding', titlePadding).css('opacity', '0.9').css('filter', 'alpha(opacity=0.9)').css('width', width).appendTo(thumbParent);
        var ptitleHeight = thumbTitle.height();
        var summary = parseInt(ptitleHeight) + parseInt(titleTopPadding) + parseInt(titleBottomPadding);
        thumbTitle.css('margin-top', '-' + summary + 'px');
        wrapper.css('float', 'left').css('height', height).css('width', width).css('margin', margins).css('overflow', 'hidden');
    });
    $('#blog-pager').css('clear', 'both');
});

function hideLightbox() {
    var images = document.getElementsByTagName('img');
    for (var i = 0; i < images.length;++i) {
        images[i].onmouseover = function() {
            var html = this.parentNode.innerHTML;
            this.parentNode.innerHTML = html;
            this.onmouseover = null;
        };
    }
}

if (window.addEventListener) {
    window.addEventListener('load', hideLightbox, undefined);
} else {
    window.attachEvent('onload', hideLightbox);
}
//]]>
</script>
<style>
.post {
    border-bottom: 0 dotted #E6E6E6;
    margin-bottom: 0;
    padding-bottom: 0;
}

h2,.post-footer {
    display: none;
}

a.postThumbnail div {
    text-decoration: none;
    color: #fff;
    font-size: 12px;
    font-weight: bold;
    text-transform: capitalize;
    background: rgb(125,126,125);
 /* Old browsers */
    background: -moz-linear-gradient(top,  rgba(125,126,125,1) 0%, rgba(14,14,14,1) 100%);
    background: -webkit-gradient(linear, left top, left bottom, color-stop(0%,rgba(125,126,125,1)), color-stop(100%,rgba(14,14,14,1)));
 /* Chrome,Safari4+ */
    background: -webkit-linear-gradient(top,  rgba(125,126,125,1) 0%,rgba(14,14,14,1) 100%);
    background: -o-linear-gradient(top,  rgba(125,126,125,1) 0%,rgba(14,14,14,1) 100%);
    background: -ms-linear-gradient(top,  rgba(125,126,125,1) 0%,rgba(14,14,14,1) 100%);
    background: linear-gradient(to bottom,  rgba(125,126,125,1) 0%,rgba(14,14,14,1) 100%);
    filter: progid:DXImageTransform.Microsoft.gradient( startColorstr=&#39;
    #7d7e7d&#39;, endColorstr=&#39;#0e0e0e&#39;,GradientType=0 );
}

a.postThumbnail:hover div {
    display: block;
}

.post-body img {
    background-color: transparent;
    border: 1px solid transparent;
    padding: 0px;
    -webkit-border-radius: 12px;
    -moz-border-radius: 12px;
    border-radius: 12px;
    opacity: 1;
    transition: opacity .25s ease-in-out;
    -moz-transition: opacity .25s ease-in-out;
    -webkit-transition: opacity .25s ease-in-out;
}

.post-body img:hover {
    -ms-filter: &quot;
    progid: DXImageTransform.Microsoft.Alpha(Opacity=70)&quot;
    ;

filter: alpha(opacity=70);
    -moz-opacity: 0.7;
    -khtml-opacity: 0.7;
    opacity: 0.7;
}
</style>
</b:if>

 Step 4:

      Now press save template and view your blog you will now having grid view.
Enjoy!

Posted at 10:14 |  by Unknown
Many New bloggers want to change their blogger read more button i will now show you how to change blogger read more button and replace it with beautiful read more buttons.


      FLOW THE STEP BELOW TO ADD THIS WIDGET TO YOUR BLOG

Step 1:

  Go to the template and edit HTML

Step 2:

     Now find this code <data:post.jumpText/>

Step 3:

         And change the image URL in the following code and replace it with the read more image that you like listed below


<b:if cond='data:post.hasJumpLink'>
<div class='jump-link'>
<a expr:href='data:post.url' expr:title='data:post.title'><img src="http://your-image-URL.gif"/></a>
</div>
</b:if >

STYLE 1:


IMAGE URL:

https://blogger.googleusercontent.com/img/b/R29vZ2xl/AVvXsEgkjvkYG4cZ8uvrk-Fbc9oST3PIYqwMapIicG-X_ezBrtgafXoO2_LowYlRN9C8wAQrz8oQ_NcNnI9fgVw0jgDsxtHCmSdgcBPAhf5L23Mmd-MrtcW9_eP4GAZFyyJ171jBjZMaU5KlXepY/s1600/black1.gif


STYLE  2 :


IMAGE URL:

 https://blogger.googleusercontent.com/img/b/R29vZ2xl/AVvXsEjyvSWu-BR9mMQ1zCAvIgoBUfWkAzXVbIQ4-vcqjLjRINGPsrVsu_G9dsf4jXWHjkWMkm1U0A_qFH2ZH7PtJuWL_jiaeQ2UyBBcyU6zSf_zT1zBE4foyo8jUG6THU_W7b8O_Ee-RFlN4jE3/s1600/cooltext666275999.gif


STYLE 3 :

IMAGE URL:

 https://blogger.googleusercontent.com/img/b/R29vZ2xl/AVvXsEhquTqrj4_lA4LddKflZ_jbc_kDYt5f2Hh8cX4QWUae_z-bdt3d8xIGW3BUi35SMmRzltjFu4Gdk9-UDDZx7TVF6tB6VNy6wZ39VQK-6R7ZytSUJXdY9DQJeebYGIXiVwi9vVGWCF7jIVhyphenhyphen/s1600/cooltext666276315.gif


STYLE 4 :

IMAGE URL:

 https://blogger.googleusercontent.com/img/b/R29vZ2xl/AVvXsEhk0ZUeSl-adomdu1QiGOsi_8Id9Q-MEzHs7q57P5DvcZaEjfoXXg2_oiAGFvkMdZCamNoWODB6NrBm98rqnLAmmEaHm79ngTawiRyZ6eiDGpMce9EeYahT4VcsYkkb3E05ELcfLSs1r5He/s1600/readmore.png


 STYLE 5 :

IMAGE URL: 

https://blogger.googleusercontent.com/img/b/R29vZ2xl/AVvXsEj06mzcI-itUDpZRJiO2U3Qh8u-3XCA1EmBaYNRHocgSmxow8Sxy5AzG84HdFu4jmBFEcPUTSWpwW8SZPvc045eTnyQBdqWjUelIjriMXd3KdiVr3ZVUBZa9j3GTNe63xWnlcGWVlypoBhy/s1600/RenderedImage.png

Change Read more Buttons

Many New bloggers want to change their blogger read more button i will now show you how to change blogger read more button and replace it with beautiful read more buttons.


      FLOW THE STEP BELOW TO ADD THIS WIDGET TO YOUR BLOG

Step 1:

  Go to the template and edit HTML

Step 2:

     Now find this code <data:post.jumpText/>

Step 3:

         And change the image URL in the following code and replace it with the read more image that you like listed below


<b:if cond='data:post.hasJumpLink'>
<div class='jump-link'>
<a expr:href='data:post.url' expr:title='data:post.title'><img src="http://your-image-URL.gif"/></a>
</div>
</b:if >

STYLE 1:


IMAGE URL:

https://blogger.googleusercontent.com/img/b/R29vZ2xl/AVvXsEgkjvkYG4cZ8uvrk-Fbc9oST3PIYqwMapIicG-X_ezBrtgafXoO2_LowYlRN9C8wAQrz8oQ_NcNnI9fgVw0jgDsxtHCmSdgcBPAhf5L23Mmd-MrtcW9_eP4GAZFyyJ171jBjZMaU5KlXepY/s1600/black1.gif


STYLE  2 :


IMAGE URL:

 https://blogger.googleusercontent.com/img/b/R29vZ2xl/AVvXsEjyvSWu-BR9mMQ1zCAvIgoBUfWkAzXVbIQ4-vcqjLjRINGPsrVsu_G9dsf4jXWHjkWMkm1U0A_qFH2ZH7PtJuWL_jiaeQ2UyBBcyU6zSf_zT1zBE4foyo8jUG6THU_W7b8O_Ee-RFlN4jE3/s1600/cooltext666275999.gif


STYLE 3 :

IMAGE URL:

 https://blogger.googleusercontent.com/img/b/R29vZ2xl/AVvXsEhquTqrj4_lA4LddKflZ_jbc_kDYt5f2Hh8cX4QWUae_z-bdt3d8xIGW3BUi35SMmRzltjFu4Gdk9-UDDZx7TVF6tB6VNy6wZ39VQK-6R7ZytSUJXdY9DQJeebYGIXiVwi9vVGWCF7jIVhyphenhyphen/s1600/cooltext666276315.gif


STYLE 4 :

IMAGE URL:

 https://blogger.googleusercontent.com/img/b/R29vZ2xl/AVvXsEhk0ZUeSl-adomdu1QiGOsi_8Id9Q-MEzHs7q57P5DvcZaEjfoXXg2_oiAGFvkMdZCamNoWODB6NrBm98rqnLAmmEaHm79ngTawiRyZ6eiDGpMce9EeYahT4VcsYkkb3E05ELcfLSs1r5He/s1600/readmore.png


 STYLE 5 :

IMAGE URL: 

https://blogger.googleusercontent.com/img/b/R29vZ2xl/AVvXsEj06mzcI-itUDpZRJiO2U3Qh8u-3XCA1EmBaYNRHocgSmxow8Sxy5AzG84HdFu4jmBFEcPUTSWpwW8SZPvc045eTnyQBdqWjUelIjriMXd3KdiVr3ZVUBZa9j3GTNe63xWnlcGWVlypoBhy/s1600/RenderedImage.png

Posted at 04:31 |  by Unknown
Favicon is an icon which is with name of the website which represent the website.Today i will show you how to make a beautiful Favicon in steps with pictures.

  Step 1:

    Go to the favicon.cc


 Step 2:

         Than press create favicon .

 Step 3:

       Than press save favicon

 Step 4:

        Than go to your website and layout and edit favicon 

Step 5:

      Upload your favicon

 Step 6:

        Press save and you have done.

How To Make Your Own Favicon

Favicon is an icon which is with name of the website which represent the website.Today i will show you how to make a beautiful Favicon in steps with pictures.

  Step 1:

    Go to the favicon.cc


 Step 2:

         Than press create favicon .

 Step 3:

       Than press save favicon

 Step 4:

        Than go to your website and layout and edit favicon 

Step 5:

      Upload your favicon

 Step 6:

        Press save and you have done.

Posted at 07:51 |  by Unknown
 When we install a template for free than the Designer of the template show their name and website at end of the template  but i will show you with pics and will give you proof  that how to remove it step by step.


Step 1:

     Go to the template and edit HTML.


  Step 2:

         Than find this code <div id='feet-left'>.

 Step 3:

        Than change the following things or delete it ,Which i have shown in the picture.

 Step 4:

   Now save the template and you have done.


PROOF: 


Delete Template Author Name From Your Template

 When we install a template for free than the Designer of the template show their name and website at end of the template  but i will show you with pics and will give you proof  that how to remove it step by step.


Step 1:

     Go to the template and edit HTML.


  Step 2:

         Than find this code <div id='feet-left'>.

 Step 3:

        Than change the following things or delete it ,Which i have shown in the picture.

 Step 4:

   Now save the template and you have done.


PROOF: 


Posted at 05:15 |  by Unknown
When we intall a template for free than the blogger show a simple that it is powered by blogger but i will show you with pics and will proof you that i have removed it step by step.

 Step 1:

     Go to the template and edit HTML.

  Step 2:

    Than find the tag </head>

 Step 3:

     And just above the head tag add this code

                     <style>
                     #Attribution1 {
                     display: none;
                      }
                     </style>

 Step 4:

         Now press ok and you are DONE.

 PROOF:


How To Remove Powered By Blooger

When we intall a template for free than the blogger show a simple that it is powered by blogger but i will show you with pics and will proof you that i have removed it step by step.

 Step 1:

     Go to the template and edit HTML.

  Step 2:

    Than find the tag </head>

 Step 3:

     And just above the head tag add this code

                     <style>
                     #Attribution1 {
                     display: none;
                      }
                     </style>

 Step 4:

         Now press ok and you are DONE.

 PROOF:


Posted at 03:50 |  by Unknown

Alexa Rank

back to top