All Stories
When we link the menu tabs with the labels than when we click the menu tab than this message comes that showing post with label .....Show all posts. Many bloggers want to remove it .If you also want to remove it follow the following steps and make it remove from blog and enjoy blogging.

                  Remove Showing Post With Label....Show All Posts  Tutorial


Step 1:

        Go to  edit HTML  


Step 2:

        Search for this code with the help of ctrl +F 
 <b:includable id='status-message'>

Step 3:

      After you find this code press the arrow and expand it 


Step 4:

  
     Now remove the code from the first to last all.


<b:includable id='status-message'>
<b:if cond='data:navMessage'>
<div class='status-msg-wrap'>
<div class='status-msg-body'>
<data:navMessage/>
</div>
<div class='status-msg-border'>
<div class='status-msg-bg'>
<div class='status-msg-hidden'><data:navMessage/></div>
</div>
</div>
</div>
<div style='clear: both;'/>
</b:if>
</b:includable>


Step 5:

   
    Now replace it with the following code

<b:includable id='status-message'>
<b:if cond='data:navMessage'>
<div>
</div>
<div style='clear: both;'/>
</b:if>
</b:includable>


Step 6:

      Now save it and you are done.Hope it will help you.


Remove Showing Post With Label in Blogger

When we link the menu tabs with the labels than when we click the menu tab than this message comes that showing post with label .....Show all posts. Many bloggers want to remove it .If you also want to remove it follow the following steps and make it remove from blog and enjoy blogging.

                  Remove Showing Post With Label....Show All Posts  Tutorial


Step 1:

        Go to  edit HTML  


Step 2:

        Search for this code with the help of ctrl +F 
 <b:includable id='status-message'>

Step 3:

      After you find this code press the arrow and expand it 


Step 4:

  
     Now remove the code from the first to last all.


<b:includable id='status-message'>
<b:if cond='data:navMessage'>
<div class='status-msg-wrap'>
<div class='status-msg-body'>
<data:navMessage/>
</div>
<div class='status-msg-border'>
<div class='status-msg-bg'>
<div class='status-msg-hidden'><data:navMessage/></div>
</div>
</div>
</div>
<div style='clear: both;'/>
</b:if>
</b:includable>


Step 5:

   
    Now replace it with the following code

<b:includable id='status-message'>
<b:if cond='data:navMessage'>
<div>
</div>
<div style='clear: both;'/>
</b:if>
</b:includable>


Step 6:

      Now save it and you are done.Hope it will help you.


Posted at 04:40 |  by Unknown
If you want to display your post in a gird  view with thumbnails to make your blog more charming here is the right place.Now you have to follow my steps and than you are done .If you have any problem you can ask me by writing a comment.

Step 1:

        Go to template and edit HTML

Step 2:

  Than press ctrl+F and find this tag </head>.

 Step 3 :

        Than just about this tag past the following code.
            
  script src="http://code.jquery.com/jquery-1.9.1.js"></script>
<script src="http://code.jquery.com/jquery-migrate-1.1.0.js"></script>

<b:if cond='data:blog.pageType == &quot;index&quot;'>
<script type='text/javascript'>//<![CDATA[
$(document).ready(function() {

    var width = 200;
    var height = 170;
    var placeholder = 'https://blogger.googleusercontent.com/img/b/R29vZ2xl/AVvXsEg6IVTcYUogTzKHiqUT-ao1nFEH5sWWNasX1_7bye-QbzO9oZQrS5V9FIvqEzkCLIExnL2Tphy72jJ2XybpiQ5v9UwVwba9IMVvVqnUpzqtzB9xX0hjDQC4uE3nueeK-vQ8tam3B8ko80Y/s1600/no-thumb.png';
    var margins = "0px 0px 10px 10px";
    var fitThumb = 1;
    var titleTopPadding = 5;
    var titleBottomPadding = 8;
    var titleLeftRightPadding = 5;

    var titlePadding = titleTopPadding + 'px ' + titleLeftRightPadding + 'px ' + titleBottomPadding + 'px ' + titleLeftRightPadding + 'px';
    $('.post-body').each(function(n, wrapper) {
        var wrapper = $(wrapper);
        var image = $(wrapper).find('img').first();
        var link = wrapper.parent().find('h3 a');
        var linkURL = link.attr('href');
        var linkTitle = link.text();

        $(link).remove();
        wrapper.empty();

        if (image.attr('src')) {
            var thumbHeight = image.attr('height');
            var thumbWidth = image.attr('width');
            var thumbParent = $(image).parent();

            wrapper.append(thumbParent);

            if (fitThumb) {
                image.attr({
                    src: image.attr('src').replace(/s\B\d{3,4}/, 's' + width + '-c')
                    });
                image.attr('width', width).attr('height', height);
            } else {
                image.attr({
                    src: image.attr('src').replace(/s\B\d{3,4}/, 's' + width)
                    });
                image.attr('width', width);
                var changeHeight = (thumbHeight / thumbWidth * width).toFixed(0);
                image.attr('height', changeHeight);
            }

        } else {
            var image = $('<img>').attr('src', placeholder).attr('height', height).attr('width', width);
            var thumbParent = $('<a>').append(image).appendTo(wrapper);
        }

        thumbParent.attr('href', linkURL).css('clear', 'none').css('margin-left', '0').css('margin-right', '0').addClass('postThumbnail');

        var thumbTitle = $('<div>').prepend(linkTitle).css('padding', titlePadding).css('opacity', '0.9').css('filter', 'alpha(opacity=0.9)').css('width', width).appendTo(thumbParent);
        var ptitleHeight = thumbTitle.height();
        var summary = parseInt(ptitleHeight) + parseInt(titleTopPadding) + parseInt(titleBottomPadding);
        thumbTitle.css('margin-top', '-' + summary + 'px');
        wrapper.css('float', 'left').css('height', height).css('width', width).css('margin', margins).css('overflow', 'hidden');
    });
    $('#blog-pager').css('clear', 'both');
});

function hideLightbox() {
    var images = document.getElementsByTagName('img');
    for (var i = 0; i < images.length;++i) {
        images[i].onmouseover = function() {
            var html = this.parentNode.innerHTML;
            this.parentNode.innerHTML = html;
            this.onmouseover = null;
        };
    }
}

if (window.addEventListener) {
    window.addEventListener('load', hideLightbox, undefined);
} else {
    window.attachEvent('onload', hideLightbox);
}
//]]>
</script>
<style>
.post {
    border-bottom: 0 dotted #E6E6E6;
    margin-bottom: 0;
    padding-bottom: 0;
}

h2,.post-footer {
    display: none;
}

a.postThumbnail div {
    text-decoration: none;
    color: #fff;
    font-size: 12px;
    font-weight: bold;
    text-transform: capitalize;
    background: rgb(125,126,125);
 /* Old browsers */
    background: -moz-linear-gradient(top,  rgba(125,126,125,1) 0%, rgba(14,14,14,1) 100%);
    background: -webkit-gradient(linear, left top, left bottom, color-stop(0%,rgba(125,126,125,1)), color-stop(100%,rgba(14,14,14,1)));
 /* Chrome,Safari4+ */
    background: -webkit-linear-gradient(top,  rgba(125,126,125,1) 0%,rgba(14,14,14,1) 100%);
    background: -o-linear-gradient(top,  rgba(125,126,125,1) 0%,rgba(14,14,14,1) 100%);
    background: -ms-linear-gradient(top,  rgba(125,126,125,1) 0%,rgba(14,14,14,1) 100%);
    background: linear-gradient(to bottom,  rgba(125,126,125,1) 0%,rgba(14,14,14,1) 100%);
    filter: progid:DXImageTransform.Microsoft.gradient( startColorstr=&#39;
    #7d7e7d&#39;, endColorstr=&#39;#0e0e0e&#39;,GradientType=0 );
}

a.postThumbnail:hover div {
    display: block;
}

.post-body img {
    background-color: transparent;
    border: 1px solid transparent;
    padding: 0px;
    -webkit-border-radius: 12px;
    -moz-border-radius: 12px;
    border-radius: 12px;
    opacity: 1;
    transition: opacity .25s ease-in-out;
    -moz-transition: opacity .25s ease-in-out;
    -webkit-transition: opacity .25s ease-in-out;
}

.post-body img:hover {
    -ms-filter: &quot;
    progid: DXImageTransform.Microsoft.Alpha(Opacity=70)&quot;
    ;

filter: alpha(opacity=70);
    -moz-opacity: 0.7;
    -khtml-opacity: 0.7;
    opacity: 0.7;
}
</style>
</b:if>

 Step 4:

      Now press save template and view your blog you will now having grid view.
Enjoy!

How To Display Posts In Girds View

If you want to display your post in a gird  view with thumbnails to make your blog more charming here is the right place.Now you have to follow my steps and than you are done .If you have any problem you can ask me by writing a comment.

Step 1:

        Go to template and edit HTML

Step 2:

  Than press ctrl+F and find this tag </head>.

 Step 3 :

        Than just about this tag past the following code.
            
  script src="http://code.jquery.com/jquery-1.9.1.js"></script>
<script src="http://code.jquery.com/jquery-migrate-1.1.0.js"></script>

<b:if cond='data:blog.pageType == &quot;index&quot;'>
<script type='text/javascript'>//<![CDATA[
$(document).ready(function() {

    var width = 200;
    var height = 170;
    var placeholder = 'https://blogger.googleusercontent.com/img/b/R29vZ2xl/AVvXsEg6IVTcYUogTzKHiqUT-ao1nFEH5sWWNasX1_7bye-QbzO9oZQrS5V9FIvqEzkCLIExnL2Tphy72jJ2XybpiQ5v9UwVwba9IMVvVqnUpzqtzB9xX0hjDQC4uE3nueeK-vQ8tam3B8ko80Y/s1600/no-thumb.png';
    var margins = "0px 0px 10px 10px";
    var fitThumb = 1;
    var titleTopPadding = 5;
    var titleBottomPadding = 8;
    var titleLeftRightPadding = 5;

    var titlePadding = titleTopPadding + 'px ' + titleLeftRightPadding + 'px ' + titleBottomPadding + 'px ' + titleLeftRightPadding + 'px';
    $('.post-body').each(function(n, wrapper) {
        var wrapper = $(wrapper);
        var image = $(wrapper).find('img').first();
        var link = wrapper.parent().find('h3 a');
        var linkURL = link.attr('href');
        var linkTitle = link.text();

        $(link).remove();
        wrapper.empty();

        if (image.attr('src')) {
            var thumbHeight = image.attr('height');
            var thumbWidth = image.attr('width');
            var thumbParent = $(image).parent();

            wrapper.append(thumbParent);

            if (fitThumb) {
                image.attr({
                    src: image.attr('src').replace(/s\B\d{3,4}/, 's' + width + '-c')
                    });
                image.attr('width', width).attr('height', height);
            } else {
                image.attr({
                    src: image.attr('src').replace(/s\B\d{3,4}/, 's' + width)
                    });
                image.attr('width', width);
                var changeHeight = (thumbHeight / thumbWidth * width).toFixed(0);
                image.attr('height', changeHeight);
            }

        } else {
            var image = $('<img>').attr('src', placeholder).attr('height', height).attr('width', width);
            var thumbParent = $('<a>').append(image).appendTo(wrapper);
        }

        thumbParent.attr('href', linkURL).css('clear', 'none').css('margin-left', '0').css('margin-right', '0').addClass('postThumbnail');

        var thumbTitle = $('<div>').prepend(linkTitle).css('padding', titlePadding).css('opacity', '0.9').css('filter', 'alpha(opacity=0.9)').css('width', width).appendTo(thumbParent);
        var ptitleHeight = thumbTitle.height();
        var summary = parseInt(ptitleHeight) + parseInt(titleTopPadding) + parseInt(titleBottomPadding);
        thumbTitle.css('margin-top', '-' + summary + 'px');
        wrapper.css('float', 'left').css('height', height).css('width', width).css('margin', margins).css('overflow', 'hidden');
    });
    $('#blog-pager').css('clear', 'both');
});

function hideLightbox() {
    var images = document.getElementsByTagName('img');
    for (var i = 0; i < images.length;++i) {
        images[i].onmouseover = function() {
            var html = this.parentNode.innerHTML;
            this.parentNode.innerHTML = html;
            this.onmouseover = null;
        };
    }
}

if (window.addEventListener) {
    window.addEventListener('load', hideLightbox, undefined);
} else {
    window.attachEvent('onload', hideLightbox);
}
//]]>
</script>
<style>
.post {
    border-bottom: 0 dotted #E6E6E6;
    margin-bottom: 0;
    padding-bottom: 0;
}

h2,.post-footer {
    display: none;
}

a.postThumbnail div {
    text-decoration: none;
    color: #fff;
    font-size: 12px;
    font-weight: bold;
    text-transform: capitalize;
    background: rgb(125,126,125);
 /* Old browsers */
    background: -moz-linear-gradient(top,  rgba(125,126,125,1) 0%, rgba(14,14,14,1) 100%);
    background: -webkit-gradient(linear, left top, left bottom, color-stop(0%,rgba(125,126,125,1)), color-stop(100%,rgba(14,14,14,1)));
 /* Chrome,Safari4+ */
    background: -webkit-linear-gradient(top,  rgba(125,126,125,1) 0%,rgba(14,14,14,1) 100%);
    background: -o-linear-gradient(top,  rgba(125,126,125,1) 0%,rgba(14,14,14,1) 100%);
    background: -ms-linear-gradient(top,  rgba(125,126,125,1) 0%,rgba(14,14,14,1) 100%);
    background: linear-gradient(to bottom,  rgba(125,126,125,1) 0%,rgba(14,14,14,1) 100%);
    filter: progid:DXImageTransform.Microsoft.gradient( startColorstr=&#39;
    #7d7e7d&#39;, endColorstr=&#39;#0e0e0e&#39;,GradientType=0 );
}

a.postThumbnail:hover div {
    display: block;
}

.post-body img {
    background-color: transparent;
    border: 1px solid transparent;
    padding: 0px;
    -webkit-border-radius: 12px;
    -moz-border-radius: 12px;
    border-radius: 12px;
    opacity: 1;
    transition: opacity .25s ease-in-out;
    -moz-transition: opacity .25s ease-in-out;
    -webkit-transition: opacity .25s ease-in-out;
}

.post-body img:hover {
    -ms-filter: &quot;
    progid: DXImageTransform.Microsoft.Alpha(Opacity=70)&quot;
    ;

filter: alpha(opacity=70);
    -moz-opacity: 0.7;
    -khtml-opacity: 0.7;
    opacity: 0.7;
}
</style>
</b:if>

 Step 4:

      Now press save template and view your blog you will now having grid view.
Enjoy!

Posted at 10:14 |  by Unknown
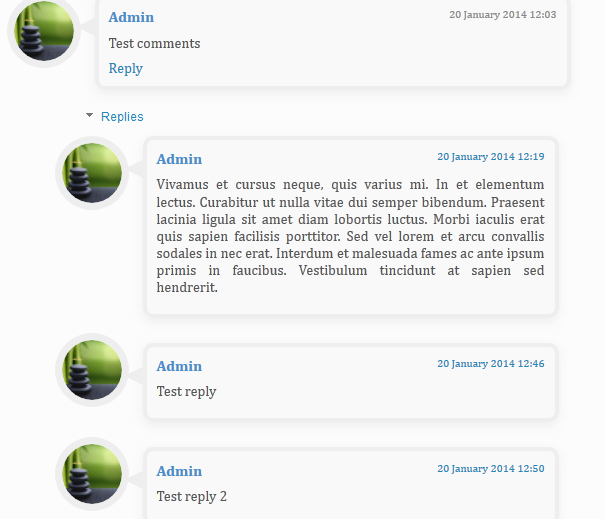
If Your template has not the comment box or your comment box is not fresh and beautiful.Here i will show you How to add a comment box to your  blog in css with simple codes.It will make your blog more charming and will also increase your website rank when some one will comment.

comment

Step 1:

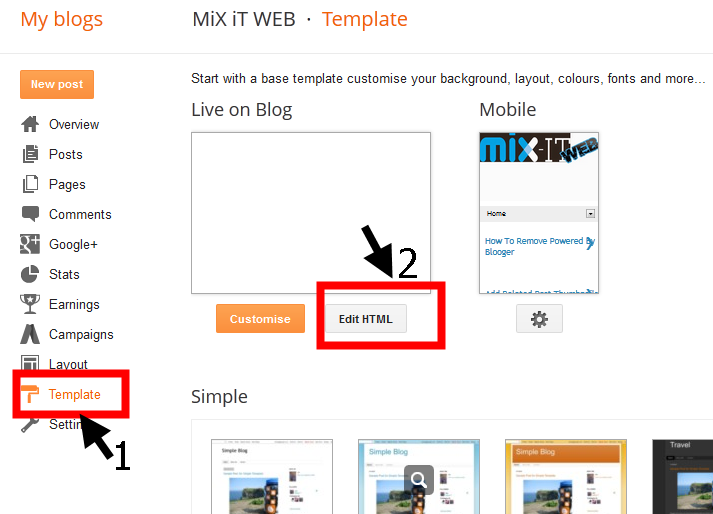
   Go to the template and than edit HTML.

edit HTML


Step 2:

     Than press Ctrl+F and Search this code ]]></b:skin>

Step 3:

      After that is find past the flowing code just above it.

  .comments .comment-block {
background: #F9F9F9;
color: #555;
box-shadow: 0 4px 10px #EEEEEE;
position: relative;
margin-top: 10px;
margin-left: 60px;
padding: 10px;
border: 4px solid #EEEEEE !important;
border-radius:10px;
font: 1.190em/1.2 Cambria,Georgia,sans-serif;
}
.comment-thread li .comment-block:before {
position: absolute;
display: block;
left: -26px;
color: #EEEEEE;
content: "\25C4";
font-size: 30px;
}
.comments .avatar-image-container {
width: 60px;
height: 60px;
max-height: 60px;
margin:0px 0px 0 -28px;
padding: 0px;
border: 7px solid #EEEEEE;
border-radius:60px;
}
.comments .avatar-image-container img {
overflow:hidden;
width: 60px;
height: 60px;
max-width: 60px;
border:0 !important;
border-radius:60px;
}
.comments .comment-thread.inline-thread {
background: none;
}
.comments .continue {
border-top: 0px solid transparent;
}
.comments .comments-content .datetime {
float: right;
font-size: 11px;
}
.comments .comments-content .user a{
font-size: 15px;
color: #498EC9;
}
.comments .comments-content .datetime a:hover{
color: #777;
text-decoration: none;
}
.comments .comments-content .comment:first-child {
padding-top: 0px;
}
.comments .comments-content .comment {
margin-bottom: 0px;
padding-bottom: 0px;
}
.comments .continue a {
padding: 0px;
}
.comments .comments-content .icon.blog-author {
background-image: none;
}

Step 4:

 Now Save the template and view your blog and you have done
  Enjoy it!


Add beautiful Comment Box To Your Blog

If Your template has not the comment box or your comment box is not fresh and beautiful.Here i will show you How to add a comment box to your  blog in css with simple codes.It will make your blog more charming and will also increase your website rank when some one will comment.

comment

Step 1:

   Go to the template and than edit HTML.

edit HTML


Step 2:

     Than press Ctrl+F and Search this code ]]></b:skin>

Step 3:

      After that is find past the flowing code just above it.

  .comments .comment-block {
background: #F9F9F9;
color: #555;
box-shadow: 0 4px 10px #EEEEEE;
position: relative;
margin-top: 10px;
margin-left: 60px;
padding: 10px;
border: 4px solid #EEEEEE !important;
border-radius:10px;
font: 1.190em/1.2 Cambria,Georgia,sans-serif;
}
.comment-thread li .comment-block:before {
position: absolute;
display: block;
left: -26px;
color: #EEEEEE;
content: "\25C4";
font-size: 30px;
}
.comments .avatar-image-container {
width: 60px;
height: 60px;
max-height: 60px;
margin:0px 0px 0 -28px;
padding: 0px;
border: 7px solid #EEEEEE;
border-radius:60px;
}
.comments .avatar-image-container img {
overflow:hidden;
width: 60px;
height: 60px;
max-width: 60px;
border:0 !important;
border-radius:60px;
}
.comments .comment-thread.inline-thread {
background: none;
}
.comments .continue {
border-top: 0px solid transparent;
}
.comments .comments-content .datetime {
float: right;
font-size: 11px;
}
.comments .comments-content .user a{
font-size: 15px;
color: #498EC9;
}
.comments .comments-content .datetime a:hover{
color: #777;
text-decoration: none;
}
.comments .comments-content .comment:first-child {
padding-top: 0px;
}
.comments .comments-content .comment {
margin-bottom: 0px;
padding-bottom: 0px;
}
.comments .continue a {
padding: 0px;
}
.comments .comments-content .icon.blog-author {
background-image: none;
}

Step 4:

 Now Save the template and view your blog and you have done
  Enjoy it!


Posted at 04:57 |  by Unknown
Many New bloggers want to change their blogger read more button i will now show you how to change blogger read more button and replace it with beautiful read more buttons.


      FLOW THE STEP BELOW TO ADD THIS WIDGET TO YOUR BLOG

Step 1:

  Go to the template and edit HTML

Step 2:

     Now find this code <data:post.jumpText/>

Step 3:

         And change the image URL in the following code and replace it with the read more image that you like listed below


<b:if cond='data:post.hasJumpLink'>
<div class='jump-link'>
<a expr:href='data:post.url' expr:title='data:post.title'><img src="http://your-image-URL.gif"/></a>
</div>
</b:if >

STYLE 1:


IMAGE URL:

https://blogger.googleusercontent.com/img/b/R29vZ2xl/AVvXsEgkjvkYG4cZ8uvrk-Fbc9oST3PIYqwMapIicG-X_ezBrtgafXoO2_LowYlRN9C8wAQrz8oQ_NcNnI9fgVw0jgDsxtHCmSdgcBPAhf5L23Mmd-MrtcW9_eP4GAZFyyJ171jBjZMaU5KlXepY/s1600/black1.gif


STYLE  2 :


IMAGE URL:

 https://blogger.googleusercontent.com/img/b/R29vZ2xl/AVvXsEjyvSWu-BR9mMQ1zCAvIgoBUfWkAzXVbIQ4-vcqjLjRINGPsrVsu_G9dsf4jXWHjkWMkm1U0A_qFH2ZH7PtJuWL_jiaeQ2UyBBcyU6zSf_zT1zBE4foyo8jUG6THU_W7b8O_Ee-RFlN4jE3/s1600/cooltext666275999.gif


STYLE 3 :

IMAGE URL:

 https://blogger.googleusercontent.com/img/b/R29vZ2xl/AVvXsEhquTqrj4_lA4LddKflZ_jbc_kDYt5f2Hh8cX4QWUae_z-bdt3d8xIGW3BUi35SMmRzltjFu4Gdk9-UDDZx7TVF6tB6VNy6wZ39VQK-6R7ZytSUJXdY9DQJeebYGIXiVwi9vVGWCF7jIVhyphenhyphen/s1600/cooltext666276315.gif


STYLE 4 :

IMAGE URL:

 https://blogger.googleusercontent.com/img/b/R29vZ2xl/AVvXsEhk0ZUeSl-adomdu1QiGOsi_8Id9Q-MEzHs7q57P5DvcZaEjfoXXg2_oiAGFvkMdZCamNoWODB6NrBm98rqnLAmmEaHm79ngTawiRyZ6eiDGpMce9EeYahT4VcsYkkb3E05ELcfLSs1r5He/s1600/readmore.png


 STYLE 5 :

IMAGE URL: 

https://blogger.googleusercontent.com/img/b/R29vZ2xl/AVvXsEj06mzcI-itUDpZRJiO2U3Qh8u-3XCA1EmBaYNRHocgSmxow8Sxy5AzG84HdFu4jmBFEcPUTSWpwW8SZPvc045eTnyQBdqWjUelIjriMXd3KdiVr3ZVUBZa9j3GTNe63xWnlcGWVlypoBhy/s1600/RenderedImage.png

Change Read more Buttons

Many New bloggers want to change their blogger read more button i will now show you how to change blogger read more button and replace it with beautiful read more buttons.


      FLOW THE STEP BELOW TO ADD THIS WIDGET TO YOUR BLOG

Step 1:

  Go to the template and edit HTML

Step 2:

     Now find this code <data:post.jumpText/>

Step 3:

         And change the image URL in the following code and replace it with the read more image that you like listed below


<b:if cond='data:post.hasJumpLink'>
<div class='jump-link'>
<a expr:href='data:post.url' expr:title='data:post.title'><img src="http://your-image-URL.gif"/></a>
</div>
</b:if >

STYLE 1:


IMAGE URL:

https://blogger.googleusercontent.com/img/b/R29vZ2xl/AVvXsEgkjvkYG4cZ8uvrk-Fbc9oST3PIYqwMapIicG-X_ezBrtgafXoO2_LowYlRN9C8wAQrz8oQ_NcNnI9fgVw0jgDsxtHCmSdgcBPAhf5L23Mmd-MrtcW9_eP4GAZFyyJ171jBjZMaU5KlXepY/s1600/black1.gif


STYLE  2 :


IMAGE URL:

 https://blogger.googleusercontent.com/img/b/R29vZ2xl/AVvXsEjyvSWu-BR9mMQ1zCAvIgoBUfWkAzXVbIQ4-vcqjLjRINGPsrVsu_G9dsf4jXWHjkWMkm1U0A_qFH2ZH7PtJuWL_jiaeQ2UyBBcyU6zSf_zT1zBE4foyo8jUG6THU_W7b8O_Ee-RFlN4jE3/s1600/cooltext666275999.gif


STYLE 3 :

IMAGE URL:

 https://blogger.googleusercontent.com/img/b/R29vZ2xl/AVvXsEhquTqrj4_lA4LddKflZ_jbc_kDYt5f2Hh8cX4QWUae_z-bdt3d8xIGW3BUi35SMmRzltjFu4Gdk9-UDDZx7TVF6tB6VNy6wZ39VQK-6R7ZytSUJXdY9DQJeebYGIXiVwi9vVGWCF7jIVhyphenhyphen/s1600/cooltext666276315.gif


STYLE 4 :

IMAGE URL:

 https://blogger.googleusercontent.com/img/b/R29vZ2xl/AVvXsEhk0ZUeSl-adomdu1QiGOsi_8Id9Q-MEzHs7q57P5DvcZaEjfoXXg2_oiAGFvkMdZCamNoWODB6NrBm98rqnLAmmEaHm79ngTawiRyZ6eiDGpMce9EeYahT4VcsYkkb3E05ELcfLSs1r5He/s1600/readmore.png


 STYLE 5 :

IMAGE URL: 

https://blogger.googleusercontent.com/img/b/R29vZ2xl/AVvXsEj06mzcI-itUDpZRJiO2U3Qh8u-3XCA1EmBaYNRHocgSmxow8Sxy5AzG84HdFu4jmBFEcPUTSWpwW8SZPvc045eTnyQBdqWjUelIjriMXd3KdiVr3ZVUBZa9j3GTNe63xWnlcGWVlypoBhy/s1600/RenderedImage.png

Posted at 04:31 |  by Unknown
It is very important that you website or blog has the subscription button with this the visitors will subscribe when they will come to your website or blog and will subscribe with  your blog and will receive your articles as you update it .So they will not miss a single article and you will increase your traffic and boost your money.

           FLOW THE STEP BELOW TO ADD THIS WIDGET TO YOUR BLOG

Step 1:

  Go to the template and edit HTML

Step 2:

     Now find this code <div class='post-footer'>  with the help of Ctrl +F

Step 3:

       Now past the folllowing HTML code above this <div class='post-footer'>

<div id="helperblogger-emailbox">
    <form id="helperblogger-emailform" action="http://feedburner.google.com/fb/a/mailverify"
    method="post" target="popupwindow" onsubmit="window.open('http://feedburner.google.com/fb/a/mailverify?uri= lordhtml', 'popupwindow', 'scrollbars=yes,width=550,height=520');return true">
        <input type="hidden" value="lordhtml " name="uri" />
        <input type="text" id="s" name="email" value="Enter Your E-Mail Here"
        onfocus='if (this.value == "Enter Your E-Mail Here") {this.value = ""}'
        onblur='if (this.value == "") {this.value = "Enter Your E-Mail Here";}'
        />
        <input type="hidden" name="loc" value="en_US" />
        <input type="image" src="http://img1.blogblog.com/img/blank.gif" id="sbutton"
        />
    </form>
</div>

Step 4:

Now find this code   ]]></b:skin>

Step 5:

   And paste this code above  ]]></b:skin>
   
#helperblogger-emailbox {
    background: url(https://blogger.googleusercontent.com/img/b/R29vZ2xl/AVvXsEhyb5b9uPocKTtWcgTmxKEzcNUN-GJBQbhgRtlMW16YQqKiftjkXnN-CnQU4oiW8n_i8NszuZaxT_E35gZP7bPdF8yBVLJwPN7Yw16hDaU02wRjuZBvH4-COmOJQF65lWJJYVUKgE14hrA/s1600/helperblogger.com-red.png)no-repeat scroll center center transparent;
    height: 143px;
    width: 368px;
}
form#helperblogger-emailform {
    display: block;
    margin: 0;
    padding-left: 42px;
    padding-top: 67px;
}
form#helperblogger-emailform #s {
    background: transparent;
    border: none;
    color: #444242;
    font-family: georgia;
    font-size: 15px;
    font-style: italic;
    height: 30px;
    margin-top: -2px;
    padding-left: 2px;
    vertical-align: top;
    width: 227px;
}
form#helperblogger-emailform #sbutton {
    background: transparent;
    border: none;
    cursor: pointer;
    height: 30px;
    padding-right: 45px;
}

Step 6:

    Save the template and now you are done.


Add Best Email Subscrition Box For Bloggers

It is very important that you website or blog has the subscription button with this the visitors will subscribe when they will come to your website or blog and will subscribe with  your blog and will receive your articles as you update it .So they will not miss a single article and you will increase your traffic and boost your money.

           FLOW THE STEP BELOW TO ADD THIS WIDGET TO YOUR BLOG

Step 1:

  Go to the template and edit HTML

Step 2:

     Now find this code <div class='post-footer'>  with the help of Ctrl +F

Step 3:

       Now past the folllowing HTML code above this <div class='post-footer'>

<div id="helperblogger-emailbox">
    <form id="helperblogger-emailform" action="http://feedburner.google.com/fb/a/mailverify"
    method="post" target="popupwindow" onsubmit="window.open('http://feedburner.google.com/fb/a/mailverify?uri= lordhtml', 'popupwindow', 'scrollbars=yes,width=550,height=520');return true">
        <input type="hidden" value="lordhtml " name="uri" />
        <input type="text" id="s" name="email" value="Enter Your E-Mail Here"
        onfocus='if (this.value == "Enter Your E-Mail Here") {this.value = ""}'
        onblur='if (this.value == "") {this.value = "Enter Your E-Mail Here";}'
        />
        <input type="hidden" name="loc" value="en_US" />
        <input type="image" src="http://img1.blogblog.com/img/blank.gif" id="sbutton"
        />
    </form>
</div>

Step 4:

Now find this code   ]]></b:skin>

Step 5:

   And paste this code above  ]]></b:skin>
   
#helperblogger-emailbox {
    background: url(https://blogger.googleusercontent.com/img/b/R29vZ2xl/AVvXsEhyb5b9uPocKTtWcgTmxKEzcNUN-GJBQbhgRtlMW16YQqKiftjkXnN-CnQU4oiW8n_i8NszuZaxT_E35gZP7bPdF8yBVLJwPN7Yw16hDaU02wRjuZBvH4-COmOJQF65lWJJYVUKgE14hrA/s1600/helperblogger.com-red.png)no-repeat scroll center center transparent;
    height: 143px;
    width: 368px;
}
form#helperblogger-emailform {
    display: block;
    margin: 0;
    padding-left: 42px;
    padding-top: 67px;
}
form#helperblogger-emailform #s {
    background: transparent;
    border: none;
    color: #444242;
    font-family: georgia;
    font-size: 15px;
    font-style: italic;
    height: 30px;
    margin-top: -2px;
    padding-left: 2px;
    vertical-align: top;
    width: 227px;
}
form#helperblogger-emailform #sbutton {
    background: transparent;
    border: none;
    cursor: pointer;
    height: 30px;
    padding-right: 45px;
}

Step 6:

    Save the template and now you are done.


Posted at 04:11 |  by Unknown
When you start blog and start writing articles every day ,It is very simple but have you ever look that how the bloggers make thousand of dollars monthly. Here i will show you how to become successful blogger and will give you  six free tips by the following of which you can become a successful blogger .

Writing Skills:

    You must have good writing  skills and writing skills means you should have good English and fast typing hands.I am not talking about that you must be expert but you must be good because that writing skills play an important role in a successful blog .


Work Hard:

      Its is not too easy to make a blog and write articles and you will become a successful blogger.But it is too hard too become a successful blogger.I have visited to many successful blogger and are working for it with last five or four year .It means that that have work hard for five year and now they are successful blogger and earn a lot of money.


Patience:

   You must have patience as i told you it need five to four years to make a successful blog and earn money from it in thousand of dollars but if you have patience you can do it and one day you will be a successful blogger so be have patience and if you don't have patience and you are quick or want quick money form a blog you must quit now.


Regularity in Posting:

        You should no publish your post irregular that will not help you in  becoming a successful blogger but will reduce your blog traffic.For example if you are not post for  one month so all the traffic will become bored because there no new thing and if you are post regularly day by day single post that will boost your traffic.


Unique Content:

                  We all know that we must have a unique content but still we copy the content of each other.When i first started blogging i was doing this but later i understand this is not correct way then i started new blog with unique content and now i am making Good money with that.One thing more when you copy some the search engine don't display your post on their web so you will be have zero traffic.

Top Five Tips To Make A Successful Blog

When you start blog and start writing articles every day ,It is very simple but have you ever look that how the bloggers make thousand of dollars monthly. Here i will show you how to become successful blogger and will give you  six free tips by the following of which you can become a successful blogger .

Writing Skills:

    You must have good writing  skills and writing skills means you should have good English and fast typing hands.I am not talking about that you must be expert but you must be good because that writing skills play an important role in a successful blog .


Work Hard:

      Its is not too easy to make a blog and write articles and you will become a successful blogger.But it is too hard too become a successful blogger.I have visited to many successful blogger and are working for it with last five or four year .It means that that have work hard for five year and now they are successful blogger and earn a lot of money.


Patience:

   You must have patience as i told you it need five to four years to make a successful blog and earn money from it in thousand of dollars but if you have patience you can do it and one day you will be a successful blogger so be have patience and if you don't have patience and you are quick or want quick money form a blog you must quit now.


Regularity in Posting:

        You should no publish your post irregular that will not help you in  becoming a successful blogger but will reduce your blog traffic.For example if you are not post for  one month so all the traffic will become bored because there no new thing and if you are post regularly day by day single post that will boost your traffic.


Unique Content:

                  We all know that we must have a unique content but still we copy the content of each other.When i first started blogging i was doing this but later i understand this is not correct way then i started new blog with unique content and now i am making Good money with that.One thing more when you copy some the search engine don't display your post on their web so you will be have zero traffic.

Posted at 12:15 |  by Unknown

Alexa Rank

back to top